Please note: these features are quite advanced and require some understanding of Mapbox dataset systems, and care to not accidentally overwrite your posts. It’s safest to make backups before messing with this in your installation!
Associating a post with Mapbox data
The best way to make sure your posts are associated with a dataset in Mapbox is to use the import option on the WP Mapbox Tools page. See this page of our documentation for instruction on this.
However, if you already have a post and you want to associate with a feature in a dataset, that is possible to do as well! Please note that you can only associate one feature at a time, so you can’t associate a whole post of different features with a bunch of features in Mapbox. It’s one to one when it comes to associating after you’ve already made a GL JS Maps post.
If you’re ready to associate it with one of your datasets, make sure you’ve entered your secret token and username into the WP Mapbox Settings page.
When you go to your post, scroll down on the right hand side to the Dataset Management metabox. You should see a select option of your datasets.
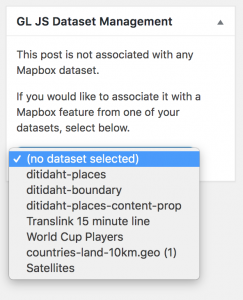
Select the dataset that has your feature in it. Once you select a dataset, another list of features will appear below. These will use a property “name” or “Name” by default, if you have this in your features, and otherwise will name by their first property, and if this doesn’t exist, it will name them numerically. Select the feature you want to link from the list that appears.

Once you select the feature you want, press the Link feature to Post button. You will see a message and the post will update. The feature is now linked to the Mapbox dataset and you will see the feature showing in the Dataset Management metabox.
Add a post to Mapbox data
You can add a post to a Mapbox dataset by following the above instructions about selecting the dataset you want to update, but instead of selecting anything under the “Link Single Feature to Mapbox”, press the “Add Features to Mapbox” button.
This will actually add any number of features you have in your post to the Mapbox dataset you have selected. After you add these features, save the post and you will see the Mapbox dataset map showing. It may take a few minutes for Mapbox to update and show your features in the minimap.

Update Mapbox Features
If you have changed information, such as map shape geometry or properties, in your feature in GL JS Maps, and you need to update the Mapbox dataset, use Update Features. This will send all of the features on your map to Mapbox, whether or not they exist there, and it will update and overwrite the features with the same ID in your dataset.
Be aware: this will overwrite properties in your dataset unless you have replicated them in your GL JS Maps post. Use with caution!

Delete Mapbox Features
Deleting Mapbox features is easy. This will not delete the shape from your local GL JS Maps post (you have to remove it using the Delete button inside the Editor), but it will remove any shape or feature with the ID of the GL JS features, but inside your Mapbox dataset. If you have not associated a feature with a given ID, nothing will happen in Mapbox.
Update GL JS Maps Feature
If you need to pull information from a Mapbox dataset feature and overwrite a local GL JS maps feature, this is the option you need to use. Your features must have corresponding IDs with features inside the Mapbox dataset. When you press “Update Post’s Features”, a warning will appear. Please be aware you will be overwriting any local geometries or properties when you do this. This will not erase properties you already have, unless the feature in Mapbox overwrites those properties.
